Creating a DIY Tactile Map for Your Child or Teen Who Is Blind or Low Vision
By Samantha Kelly
As parents, we are always looking for strategies to increase the independence of our children who are blind or low vision, no matter the area of the expanded core curriculum. To increase independent orientation and mobility or travel skills, students will work with an orientation and mobility specialist and their parents to learn many valuable techniques and utilize various tools to travel safely and efficiently.
When learning specific routes or orienting to specific spaces, the right tool for the job may be a tactile map. Despite what your teenager may think, tactile maps have not been replaced by navigation on the phone.
No one would expect a parent to make a map of each route their child may encounter during the day. Find one meaningful route essential to learn or will be repeated and focus on creating a map. This may be a map of the classroom for next year or the route from your house to the community pool. You will find endless resources on making tactile maps using 3D printers and Tactile Graphics machines with swell paper, but most parents do not have access to these tools at home. This is the time to let your Pinterest crafty side shine.
How to Make a Tactile Map
Here are some key factors to consider when making a map.
- It should be portable or at least manageable as your child travels.
- It should be durable enough to withstand children! But seriously, you do not want pieces falling off as your child navigates the sidewalk.
- Determine what is important to place on the map, such as landmarks, intersections, and obstacles. Use various textures to replicate or symbolize these objects.
- The use of a key can assist your child in identifying the objects.
- Make sure to leave at least 1/8th of an inch of space between objects for readability.
- Try to make the map to scale, but don’t worry; your child is unlikely to judge your map-making skills.
- Try to orient the map using cardinal directions, with the top of the map facing north.
- Take into consideration your child’s needs by using contrasting colors, braille labels, or using large print.
Craft Supplies You Can Use
You can use paper, textured paper, felt, foam (the adhesive kind is wonderful), glue gun (makes beautiful streets), puff paint (less likely to burn you), foam stickers, Velcro, recycled items, popsicle sticks, etc.
Take pride in your effort as a tactile cartographer or mapmaker. Share your successes and failures with other parents on social media and inspire them to attempt to make their own maps. You can involve your child in the process of making maps. If you would rather skip the do-it-yourself process, there are commercial kits such as the Picture Maker Wheatley Tactile Diagramming Kit or the Tactile Town: 3-D O&M Kit.
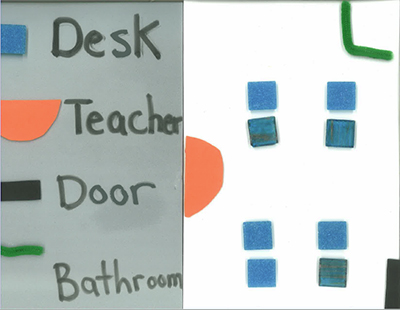
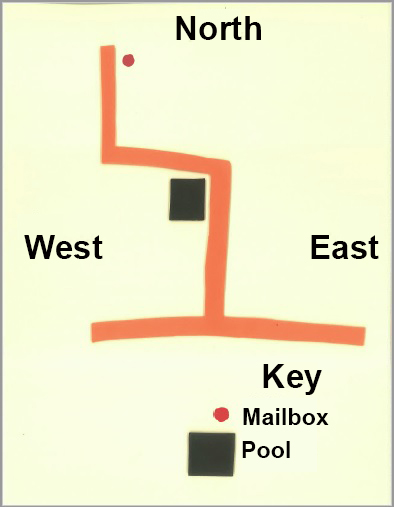
Examples of Tactile Maps